Showing posts with label shoes. Show all posts
Wednesday, September 11, 2013
My Outfit ~ Sole Society Alayna
Hi lovelies! I recently received these amazingly gorgeous shoes from Sole Society and couldn't wait to share them with you! These are the Alayna T-Strap Pump and are so comfortable and versatile I swear you'll never want to take them off! Wanna see how I wore them? {Click to keep reading!}
Wednesday, March 20, 2013
Wedding DIY ~ Rhinestone Shoe Clips
Hi lovelies! With wedding season approaching, I am sharing wedding-appropriate DIYs for the bride that wants to save a bit and not go into debt over her big day! There certainly are times to splurge, but there are many, many more areas in wedding preparations where you can save big time. I don't know about you, but I'd rather save wherever possible! Today we are talking wedding shoes. While I don't really have any 'bride' shoes in my closet, I decided to demonstrate on a pair of lavender platform sandals (which I personally would absolutely wear if I got married again (went traditional first time, I'd definitely go unconventional round two!)
I was inspired by these peep toe shoes I spied in a wedding magazine, and realized that why splurge on a pair of shoes you'll only wear once? {Click below for the how-to}
Sunday, April 29, 2012
Lavender Platform Peep-Toe Heels
Hi lovelies! I wanted to quickly share with you an AMAZING find I scored yesterday at Kohl's.
Seriously, how GORGEOUS are these shoes? Perfect for spring/summer, and they are a total STEAL, on sale for $24.99 from $59.99.
RUN, don't walk, to Kohl's and snatch these babies up, ladies!
xxoo
Lia
Monday, November 14, 2011
Tuesday's Tips ~ How I Scored Miu Miu Pumps for $40 and How to Stretch Your Leather Shoes
Hiya lovelies! So today I thought I'd share with you how I scored my amazing Miu Miu pumps, seen in yesterday's post.
What's been your best thrift/consignment store find?
xx
Lia
MonDIY ~ DIY Miu Miu Inspired Glitter Pumps
Hey lovelies! Hope you're having a great start to your week. As I mentioned in today's earlier post, I have another DIY for you today. Hope you're as excited as I am! This one was a learning process. And by learning I mean do not use any other glitter than Martha Stewart's. Period.
I think we've all been coveting the glitter Miu Miu pumps, I sure know I have been. Alas, there's no way in hell I'm about to drop $522 (hey there's on sale from $675!) on a pair of trendy shoes that will be worn for less than a year. Here's our inspiration:
And here's how you can get it for $500 less than that great sale price :)
I bought these heeled loafers from the thrift store for $6 and they had no signs of wear! I also used JoAnn's brand of glitter, which is not meant for this project. So learn from my mistake! I mixed the glitter and Mod Podge in the bowl and applied two coats with the foam brush. Two chunky uneven coats.
And I had this mess. So a quick trip to Michaels and....
I grabbed Martha Stewart's silver glitter, as well as some silver metallic acrylic paint. I used my xacto knife to cut off any large chunks of glitter, and then I mixed the new glitter with Mod Podge and applied several coats.
You can see where I applied the silver paint, and how fabulously sparkly these shoes are!
And this is my finished product! Altogether, I spent about $22 for the supplies, a full $500 less than the sale price, and I will have no problem if I only wear these for a few months!
Have you embraced the Miu Miu glitter heels trend? Would you rather spend the money on the real deal or make your own for a fraction of the cost?
xx
Lia
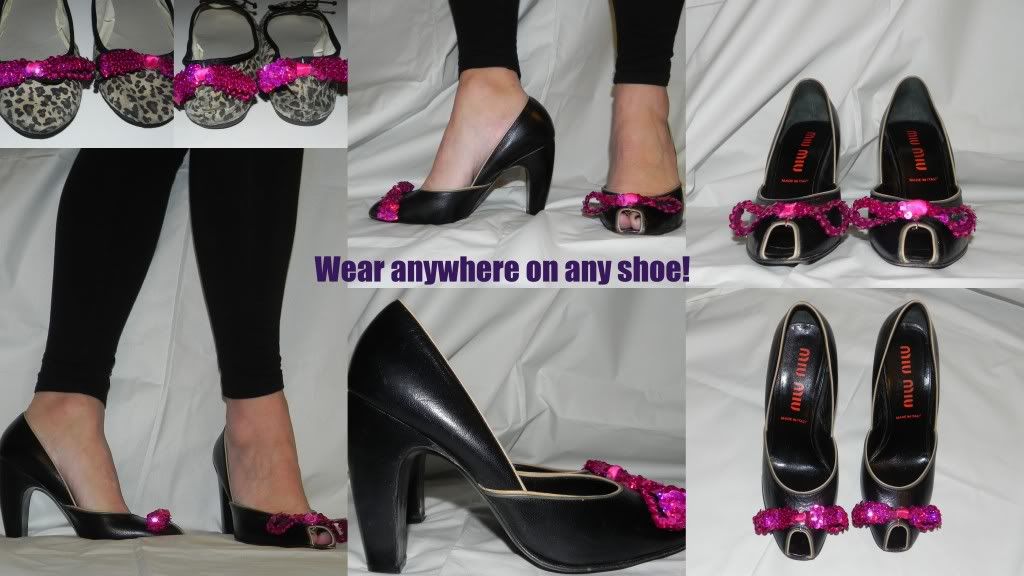
MonDIY ~ DIY Sequin Bow Shoe Clips on Fashions Blogs
Hi lovelies! I hope you had a fabulous weekend! Mine was a little cray-cray. I'll write about it later, after I get the pics off the hubs' camera :)
Today is your lucky day. You'll be getting 2 DIYs from me today. One will come tonight, but for now I'll share my post from yesterday on Fashions Blogs, some sequin bow shoe clips. This was a fun and easy DIY and it includes a bit of shoe porn. You may see these shoes again in tomorrow's post...
What do you think of these? They came out kinda cute I think and are a whimsical touch to any shoes :)
xx
Lia
Thursday, October 20, 2011
DIY ~ Refashioned Rose Gold Glitter Shoes
Hello lovelies! It's Thursday, which means it's time for me to link up to Natasha and Kim's Old to New in October! Today's inspiration comes from the Sam Edelman Adena Rose Gold Flat. I love these shoes and still covet them, but I'm on a shopping break, so it's a no go for me right now.
After seeing Grace's Rose Gold Miniaudiere DIY, I knew what I had to do. I gathered my supplies and followed her perfect instructions.
I stuffed the shoes with newspaper so they would kind of hold shape and also so I wouldn't mess up the insides too much. Also, in hindsight, I should have added alot more glitter to my mod podge, since I ended up doing like 8 coats!Here it is after one coat. Let each coat dry thoroughly before applying the next!
And here's what they look like now! I thought they were done, until I took the picture and the flash revealed some still visible zebra stripes. Ughhh. Another coat tonight and hopefully that should do it!
I cannot wait to wear these with some ankle length trousers!
Be sure to visit Natasha and Kim's blogs as well as the other ladies who are linking up their projects too! Also, Old to New in October is sponsored by Anika Burke Eclectic Boutique, so be sure to check them out as well!
If you haven't already, don't forget to enter my Shabby Apple Cameo Necklace Giveaway!!!!
xxooxoxo
Lia
Thursday, October 6, 2011
DIY ~ Refashioned Pretty & Punk Shoes
Hello lovelies! I was so thrilled to get so many fabulous DIY suggestions last week (post here), and both Megan of The Frugalista Diaries and Alicia from Fashion by Alicia suggested I do something to an old pair of shoes. Well I had just the shoes, and just the supplies! It fits in perfectly with the challenge Natasha from Required 2 Be Inspired and Kimberly from A Little Bit of This are hosting for the month of October: Old to New in October. As Natasha explains, "The idea behind Old to New in October is to take something old from your closet and refashion it to something new and fabulous!" Is that a killer idea and just right up my alley or what?! So let's get started on this easy and fabulous DIY!
- Old shoes that you are ready to part with
- Lace ribbon (this is vintage, I got it at the thrift store)
- Liquid Stitch
- Studs (these are from a contest I won from M&J Trimming)
- Scissors
Use the lace ribbon and wrap it around the shoe, folding/overlapping where needed (where the shoe curves) and cut the lace.
Figure out how you want the studs on the lace, and use jewelry pliers to bend the prongs around the lace.
Now you have your studded lace trim! Time to apply it!
Apply about 2 inches of liquid stitch to your shoe and then put your studded lace over the glue, pressing firmly (your fingers will get messy, so get over it). When the shoe begins to turn, you will need to snip a notch in the lace at the top and fold it over itself so that the trim still lines up nicely at the top.
Side is done :) I let it dry for a little while before I moved to another part of the shoe so the lace didn't move. You could also use some clips to hold the lace to the shoe instead of waiting. Hindsight :)
Finish the shoe, and then repeat the whole fabulous process for the other shoe. Let dry for 24 hours.
Finished product! I'm kinda loving them. They are an absolutely unique pair of shoes, and best of all, cost nothing!
Do you love this upgrade? I have so many ideas on other shoe upgrades now! Can't wait to get them going!
xoxo
Lia
Tuesday, March 22, 2011
DIY *Link Love*
Some amazingly talented ladies have been putting together some pretty incredible DIY's recently! I am so enamoured with some of them that I felt the compelling urge to start doing a *Link Love* weekly post!
The uber creative Maya of Soccer Mom Style posted this amazing tutorial of her DIY inspired by Chanel's Ice Cube Clutch. I'm in love with it. Must make this. Not only did she make the clutch, she made a matching ring as well as an ice box clutch shaped to look like a bottle of Chanel No. 5!
Jessica from What I Wore had two DIYs that I am itching to try.
First, she showed us how she made some adorable white striped sunnies. So simple!
My next fave is her Denim Wedge DIY. I just need to find some wedge sandles in need of a facelift now :)
The lovely Alicia from Dismount Creative made a TO. DIE. FOR. leather bracelet. She did such an amazing job and I love it!
Alicia also made a Dollhouse Chair Jewelry Treeto rival that of inspired by one from Urban Outfitters. I am going to Hobby Lobby to get the supplies and make my own this week, stay tuned!
I hope you all love these projects as much as I do! If you have a project you would like included in the next *Link Love* please send me an email :)
xxooxoxo
Lia
The uber creative Maya of Soccer Mom Style posted this amazing tutorial of her DIY inspired by Chanel's Ice Cube Clutch. I'm in love with it. Must make this. Not only did she make the clutch, she made a matching ring as well as an ice box clutch shaped to look like a bottle of Chanel No. 5!
Jessica from What I Wore had two DIYs that I am itching to try.
First, she showed us how she made some adorable white striped sunnies. So simple!
My next fave is her Denim Wedge DIY. I just need to find some wedge sandles in need of a facelift now :)
The lovely Alicia from Dismount Creative made a TO. DIE. FOR. leather bracelet. She did such an amazing job and I love it!
Alicia also made a Dollhouse Chair Jewelry Tree
I hope you all love these projects as much as I do! If you have a project you would like included in the next *Link Love* please send me an email :)
xxooxoxo
Lia
Monday, February 28, 2011
DIY: Turn Any Shoes Into Ankle Fringe Gladiators!
{please forgive the state of my pedi!} I have been wanting to add some fringe to my shoes, but I didn't want to permanently affix anything to my shoes. I found a yard of this microfiber material at the thrift shop for $1 and took a little inspiration from my favorite blogger, ...love, Maegan (seriously, check out her ankle adornment DIYs!).
These are the only materials you will need: some fabric, scissors, measuring tape, and newspaper.I decided to make mine a bit wider than the circumference of my ankle (8") because I wanted it to wrap over. But if you do not, I would take your ankle's circumference and add about 1/2" to it. Cut out a rectangle of newspaper that is your desired with and length. I chose 4" in length because that is as long as I wanted the fringe to be.
I wanted the fringe to be shorter in the back than in the front so that the fringe wouldn't get caught in the back of my shoe between my heel and shoe (again, totally optional), so I marked down on either side of my rectangle 2".
Draw a curved line about one inch away from the center 4" line, starting at the bottom and ending at the bottom of the edge of the rectangle, 2" down. Fold the paper in half and cut along this line.Using the newspaper shape as your pattern, pin it to your fabric and cut the shape out of the fabric.
Lather, rinse, repeat.
{here's where I really wish I had those fringe scissors!} I started in the bottom middle (curved side) and started cutting fringe, leaving about 1-1/2" left at the top (straight side)
I then (obviously didn't take pictures) cut a strip of the same fabric, about 3 times the length of my fringe shape and about 1/2" - 3/4" wide; I just eyeballed it and did not make it perfect in any way. As pictured above, I cut 2 slits in the 1-1/2" allowance, about an inch apart and the length of the width of the strip. Lace the strip through, leaving about 8" on the side closest to the strip and the remainder on the other side.
Here's one finished product! Again, lather, rinse, repeat.
Wrap them around your ankle and tie them in the front or back. I chose to tie them in the front with a larger bow. Wear them on their own (the initial pic at the top of the post), or pair with your favorite neutral shoes. Here's some Guess brown leather peep toes.
Paired with my favorite BCBG platform pumps on the planet!
Getting a little funkier with my wooden heeled strappy heels. Gives them such a punch!
Dress up your flip flops!
My favorite reef flip flops :)
I hope you love these! You can make them in any color so that they match your shoes better. (brown on brown, black on black, etc.)
Here I am with my favorite neon pink cardi from Forever 21. I always wear it when the rest of my outfit is all darker colors (today was a black top, black pants, and leopard print flats).
Subscribe to:
Posts (Atom)